Friday, 18 July 2014

INSTALL WHATSAPP IN ANY PC(windows 9x/2k/xp/vista/7/8).

Watu wengi sana wanapenda kuwa na whatsapp kwenye Pcs zao ila imekuwa ni ishu kubwa pale ambapo anahitajika kuwa na RAM(rondom access memory) kubwa mfano bluestack emulator itatumika pale tu ambapo una memory ya 2.0Gb na zaidi lakini leo nawaletea whatsapp bila emulator na bila kuhitaji memory kubwa fuatana na mimi hapa chini:nitatumia kiingereza na kiswahili kwasababu hii ni international post:

How to use WhatsApp on your PC/ laptop without Bluestacks or any other emulator

Ever wished to use WhatsApp from your computer? That too without using BlueStacks or any other emulators and virtual machines? Here is a quick and easy method that is completely free, reliable and friendly on your computer resources.

What you need:

  • WhatsApp registration tool, WARTdownload here
  • Get Pidgin from download here
  • Get WhatsApp-Purple latest binary from davidgf.net/nightly/whatsapp-purple
  • Latest whatsapp.dll download here
  • Here is how you can use WhatsApp running on your computer:

    1. Run WART and give your phone number with country code. Example: 255 is the country code for Tanzania.
    2. Leave the password field blank and click on Request Code button.
    3. You will get a SMS/call from WhatsApp shortly with a code.
    4. Type the code in the WART tool and click on Confirm Code button. It will give you a password, copy it to a text file.
    5. Install Pidgin but do not run it. If it launched automatically, use Ctrl + Q to quit it or Buddies -> Quit.
    6. Copy the last-whatsapp.dll file into plugins directory within your Pidgin installation (Pidgin Portable/Apps/plugins or C:\Users\\AppData\Roaming\Microsoft\Windows\Pidgin\plugins)[windows 8/8.1....go here C:\Program Files (x86)\Pidgin\plugins]
    7. Launch Pidgin
    8. Click on Add button if Pidgin launches the user account setup wizard automatically. If not, click on Accounts > Manage Accounts > Add.
    9. In Basic tab, Login Options section, Select WhatsApp as the protocol. Your phone number with country code as user name Give the password you got from WART in step 4.
    10. Click on Add button.
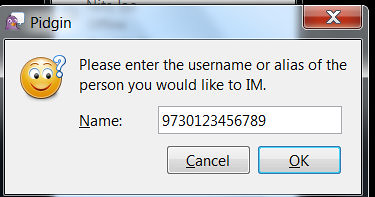
    11. To give an instant message: Click on Buddies > New Instant Message > Give your friend's phone number with country code > without"+" Click on OK button.
      To add a buddy: Click on Buddies > Add Buddy > Give your friend's phone number with country code and provide other details > Click on Add button.
      PLEASE: If you are Linux/ Mac user, you can also enjoy WhatsApp. Steps are almost same. CONSULT ME HERE IF YOU FACE ANY PROBLEM.I AM READY TO HELP.

    Monday, 7 July 2014

    Solution for:WINDOWS 7 AND WINDOWS 8 ACTIVATORS(LOADERS) Download the activators here.

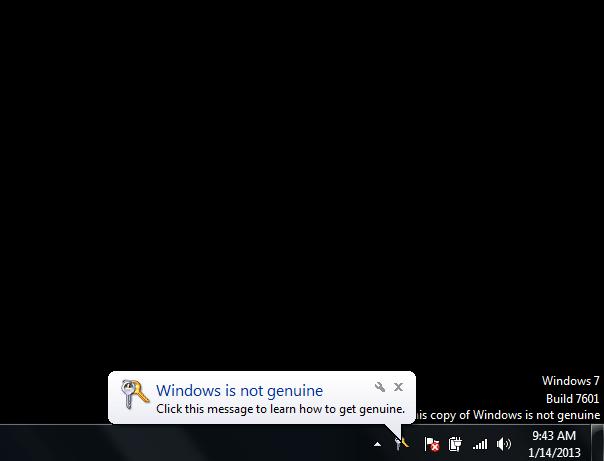
    Watu wengi wanalalamikia hii kitu " Window 7 Build 7601 This Copy Of Windows Is Not Genuine" kiukweli hii ni biashara Microsoft wanataka pesa kwa kuuza copy ya os application so ndo maana unapata tatizo hili.Hapa leo tutapata suluhisho kwa KUDOWNLOAD HAPA activators buuure kabisa.

    FACT:

    "kama una uwezo wa kununua original software nunua uwa support hawa watu tafadhali."

    Sunday, 6 July 2014

    Namna ya ku-UNLOCK HUAWEI E303 Modem.

    Waungwana hope mko salama! Leo nimeona niweke sawa somo letu la ku UNLOCK modem za E303 Hizi modem zimekuwa zikiombwa sana na watembeleaji wa blog hii kwa muda mrefu.Karibuni tupeane mawili matatu.(Mtaniuwia radhi kwa mchanganyiko wa lugha mbili kwani haina jinsi inapaswa kila mtu aweze kuelewa)
    Twende moja kwa moja....Hii modem unapotaka ku UNLOCK hakikisha umedownload E303 firmware ambayo itaUPDATE hyo iliyopo na modem yako itaweza kutumia LINE za mtandao wowote. Fuata Maelekezo yafuatayo Download E303 firmware (IKO HAPO CHINI KABISA) na baada ya kudownload....Hakikisha una DISCONNECT internet access kwa computer yako Na baada ya hapo, EXIT modem Dashboard (Yaani Exit ile icon ya modem inayokaa kwa ICONS TRAY) alafu RUN hyo software iliyopo hapo chini (HUAWEI E303 Firmware).... Baada ya kuRUN hyo software E303 hakikisha unakuwa na master code calculator ambayo Pia ipo hapo chini Moja kati ya master code calculator ni kama hii...
    Basi ukishaSTART E303 processing....ikileta sehemu ya kuingiza pasword weka FLASH CODE utakayokuwa umeipata baada ya kutumia IMEI ya Modem yako ku CALCULATE kwa Master Code Calculator..... Ukimaliza hayo yote computer yako itaPROMPT kama inainstall kitu hivi, Jitulize ukiwa umeshika mkononi LINE yako ya Mtandao wa "KAZI NI KWAKO" sasa unaweza ukatumia line ya mtandao wowote kupata internet. Download E303 Firmware

    10 Photoshop Tips and Tricks for Beginners.

    Photoshop is a heck of an amazing software that can really help your creativity express itself through a variety of useful tools. It’s also excellent if all you want to do is retouch a photo a bit before you post it on your site or anywhere else. If you are a Photoshop beginner, only recently exposed to the wonders of this advanced design machine, read on. We have gathered a few tips and tricks that could really make a difference as you move forward with your next few images. Note: The shortcuts are phrased for PC users. Mac people – you know what to do with them.

    10 Photoshop Tips and Tricks for Beginners

    Transform

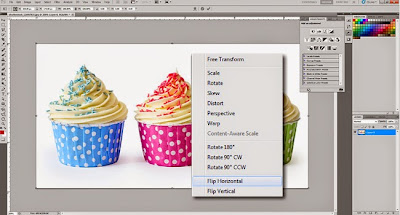
    When you want to change the size of an image, rotate, flip or distort it, you can always do so by clicking Edit, then click Transform and select the action you desire. To make life easier, there’s a shortcut you can use. Simply press Ctrl + T on your keyboard and a bounding box will then appear around the image, indicating transformation. This means you can now resize your image. The best way to do so is by placing the cursor on one of the rectangle corners and then dragging the corner while holding the Shift key. When you’re finished just press Enter and you’re done. To flip your image vertically or horizontally press Ctrl + T and then right click your mouses. A popup window will appear with a few options for rotating and flipping the image. Select the action you want and when you are done press Enter.
    Similarly, to distort or skew the image press Ctrl + T and then place the cursor on one of the corners you want to distort. Press Ctrl while holding your mouse down on the corner and dragging it down to wherever you want, then press Enter to activate.

    Change the Unit of Measurement

    A short and quick way to switch between units of measurements is to place the cursor on one of the rulers (press Ctrl + R to show or hide the rulers), and right click, then choose a new unit from the context menu. You have a wide variety of units there, from centimeters to pixels, millimeters, points and even percents.

    Magnetic Lasso Tool

    This is an easy selection tool that helps you trace and outline a part of an image, and to separate it from the rest of the image in order to perform certain actions. For example, you can select and separate a product from its background. The magnetic lasso tool detects the edges of an object, so it works best when you have a bold contrast between an object and its background with well defined edges. You can find this tool in the tools panel. To access the Magnetic Lasso, click and hold your mouse button down on the Lasso Tool until a fly-out menu appears . The magnetic lasso is the last one with a small magnet on it’s icon. Select it and then go to your image and place your mouse on the edge of the part you want to select. Click your mouse once, release and just go over the edges of the object you want to select (just like you do with scissors when you cut something out).

    Magic Wand Tool

    The Magic Wand is another selection tool, ideal for when you are working with a background that is very monotone and consistent. If you have a clearly defined color that you want to choose in an image, this is the tool for you. For example, the Magic Wand is great when you want to select a white background or a clear blue sky. Choose the magic wand tool from the tools panel and click on the part of the image you want to select. Make sure that you toggled the “add to selection” option on the top bar (icon of two squares) so you can keep on adding colors and tones to your selection.
    Using the Magic Wand tool we selected and deleted Manhattans blue skyline

    Custom Shape Tool

    The Tool Panel offers all the basic shapes you need like square, line, circle, ellipse etc. However, if you’d like to have extended options check out the custom shape tool. Represented by icon that kind of resembles a roadkill (but it’s far from it!) the custom shape tool is easy to find on the Options Bar. After you select it, a world of shape options will reveal itself to you. A shape preview thumbnail will appear to the right of the Custom Shape Tool icon. The selection is great and you can access even more shapes by clicking again on the small arrow on the right side of the panel. If you are looking for banners, speech bubbles or arrows of all kinds, this is just the tool for you.

    Adjustment Layers

    As you use Photoshop for whatever purpose, like change colors of an image, make it sharper or improve the contrast, remember to always use the adjustment layers. The big advantage of the adjustment layer is that you don’t make the changes on the image itself but on a separate layer, so you can always change the settings to see which adjustment works best for you. You will find adjustment layers in the bottom of the the Layers Panel (a black and white circle icon).
    Sharpen and improve your photo using Adjustment Layers

    Layer Styles

    This is a simple & easy way to add some pizazz to your image. Layer styles are special effects that can be quickly applied to individual layers. All you have to do is double click on a layer and then choose the effect you like. You can select from a whole variety of features, add a stroke or a glow, drop a shadow, and much more with just a click of the mouse. Be careful you don’t overdo it. These effects have a tendency to look cheap and sleazy when there’s too much of them.

    Spot Healing Brush

    Yes – it’s exactly like it sounds, this tool will make everything look prettier! If you have a spot, blemish, or a mole this tool will remove it instantly. It can also be used as a pimple remover. Just place the brush over the area you want to “fix”, make sure the brush is a bit bigger than the blemish and click. Photoshop automatically samples from around the retouched area so you really don’t need to do anything else.

    Dodge Tool

    The Dodge Tool lightens pixels where you use it. This is a great solution for red “tired eyes”. Set the Dodge Tool to a soft brush, go to Range setting in the menu-bar’s pull-down and choose highlights, set Exposure on around 20%. Then carefully brush over the eye area. Remember not to overdo it, or your model will start to look like an alien. A few simple strokes should do the job.

    Blur Tool

    A simple and delicate way to remove small wrinkles is to blur them a bit. Use the Blur tool to smooth-out small imperfections like the wrinkles around the eye or mouth area and simply blur them into the background. Again, be gentle and remember not to overdo it or instead of improving your image you’ll end up spoiling it. The Blur tool can be used for repair as well as more artistic purposes so it’s important to become friendly with it.
    What a difference the Dodge and Blur tools can make! With a little help of Adjustment layers

    TIPS TO IMPROVE YOUR SMARTPHONE BATTERY LIFE.

    I know nearly all of us we know about the smartphones getting launched nowadays, comes with top-notch multimedia features. You can play high-end games, can browse the web, can watch videos, can listen to your favorite music tracks and many more things on these smartphones. Well, to enjoy all these features, your smartphone must have a long lasting battery. Sadly, most of the smartphones user are not happy from the battery backup they get on their smartphones.
    If you are one of those who are getting less battery backup than promised by the maker, then there must be something wrong going on, something that is eating your battery power. You can improve your smartphone’s battery by following the tips mention ahead. Check them out.

    Dim the Screen.

    By default, the smartphones’ screens come with the brightness that is more than what you require. High brightness of the screen is the biggest battery power eater. Therefore, in order to improve smartphone battery life, the very first thing that you should do is reduce the brightness level. You can do so by going to the settings section of your smartphone.

    Kill the Unnecessary Background Running Apps

    There are many apps that always keep running in the background of your smartphone, without even notifying you. Most of these apps are totally waste, and are meant to disturb you by eating the battery level. Just go to the Settings section of your smartphone and check out the apps that are of no use for you, but are running in the background. Disable or delete such apps straightaway.

    Turn Off GPS, WiFi and Bluetooth When Not in Use.

    All the smartphones come with WiFi, Bluetooth and GPS facilities. These features are like boon for everyone, but at the same time, battery eaters as well. Most of the smartphones users do not take time to turn them off when not in use. As a result, these keep running in background and keep on eating smartphone’s battery. In order to improve the battery life, you must turn off these aforementioned things, when not in use.

    Keep your Smartphone Software Updated.

    Depending on your smartphone’s company, you might be getting software updates time-to-time. The software updates are pushed by every maker to enhance the users’ experience. If you get any software update, then consider installing it. The software updates ensure the most up-to-date features and less battery consumption. By installing the latest software update on your smartphone, you will surely find its battery improved.

    Use Battery Saving Apps.

    Just go to the app store meant for your smartphone, and search about the battery saving apps there. You will come across many apps. Use the best on your smartphone to improve its battery. These apps don’t do any magic, but tweak the settings in your smartphone in the way that the battery consumption becomes minimal and you get long battery backup. So, it was the list of best tips to improve smartphone battery life. Implement these tips practically to improve battery life of your smartphone. If you have found some ways to improve the performance of your smartphone, share with us in the comments below. Also, don’t forget to share this article with your friends if you found it to be useful.